
How to Use Mimic Studio: Comprehensive Guide
- David Bennett
- 5 days ago
- 6 min read

Introduction
Mimic Studio is an AI‑avatar creation and deployment platform that enables individuals and organizations to build lifelike digital humans and integrate them into workflows across marketing, training, gaming and customer support. The Studio combines creative flexibility with professional scalability and allows you to manage projects, design avatars, generate videos and analyse engagement within a unified workspace.
This guide provides a step‑by‑step walkthrough of the platform’s features so that new users can get up and running quickly.
Getting Started
Sign‑Up and Login
Access the platform: Navigate to studio.mimicminds.com in the web browser. You’ll need to create an account or log in with existing credentials.
Account creation: Use the Sign Up tab to register. Provide your email address and choose a secure password. After confirming your email, you can log in.
Choose a plan: Mimic Studio offers a variety of flexible paid plans designed to match different creative needs and production scales. Each plan includes a set number of minutes, with the option to purchase additional usage as needed. You can easily upgrade or adjust your subscription anytime through the Plans section in the Admin Panel.

Navigating the Dashboard
After logging in, you land on the Dashboard. Here you’ll see a welcome panel and quick links to the core features: Browse Avatars, Create Video and View Analytics. The right sidebar shows your plan details, usage minutes and plan status. Scroll down to see a carousel of popular avatars.

Working With Avatars
Browsing and Selecting Avatars

Open the Avatars page: From the left‑hand navigation, choose Avatars. The Avatars page allows you to select or upload characters. At the top you can search by name or type and filter between 2D and 3D avatars. Built‑in avatars represent various professions and styles (e.g., a playful animated character or a tech‑savvy gaming enthusiast)
Preview an avatar: Click any avatar card to open a modal. You’ll see a larger image, a brief description and a Start Chat button. The description outlines the avatar’s intended personality and use case. You can choose from avatars such as:
Kai – Intelligent, expressive, and ideal for professional or futuristic content
Claire Sterling – Warm, confident tone suited for business, marketing, or lifestyle
Kiki Kai – High-energy and playful for entertainment or youth-focused videos
Professor Lumen – Educational expert perfect for tutorials and explainers
Max Crit – Bold, confident personality for commentary or gaming content
Sage Zenari – Calm and mindful, ideal for wellness and coaching
Axel Miles – Your mobility and smart-city assistant
Coach Steele – Strong, motivational presence for fitness or training content
Evan Porter – Friendly and charismatic general-purpose presenter
Lys Laurent – Stylish, contemporary, and great for fashion or creative brand content
Start a conversation with your AI avatar: After selecting an avatar, click Start Chat to open a conversation window. From there, you can ask questions, work through scenarios, or use the built‑in quiz feature where the avatar asks you questions to test your knowledge. This interaction provides a flexible way to engage with the avatar, whether for information, practice, or assessment.

Character Builder (Coming Soon)
Coming Soon – with an interactive guide
Although the Character Builder itself is still under development, you can click the How To button in the Character Builder section to access a guided tour. This interactive guide walks you through the planned workflow for designing fully customizable AI characters with control over gender, body proportions, facial features, skin tone, hair, and clothing. The steps outlined include:
Enter Basic Information – Add your character’s name, select the type (male or female), and write a brief description.
Customize Appearance – Use the customization tools to adjust body proportions, facial features, hair and skin tone, and clothing. The interface provides a real‑time preview of your changes.
Save Your Changes – Once you’re satisfied, click Save to store your new character. You can return later to edit or refine the design.
Happy Creating – After saving, your character will be ready to use in Mimic Studio projects once the builder goes live.

Stay tuned for the full feature release, but in the meantime the guided walkthrough helps you understand what’s coming and how to prepare for it.
Creating AI-Powered Videos
The AI Video Creator in Mimic Studio allows you to turn written scripts into fully produced AI-presenter videos. Follow these simple steps to generate your own video directly from your dashboard.
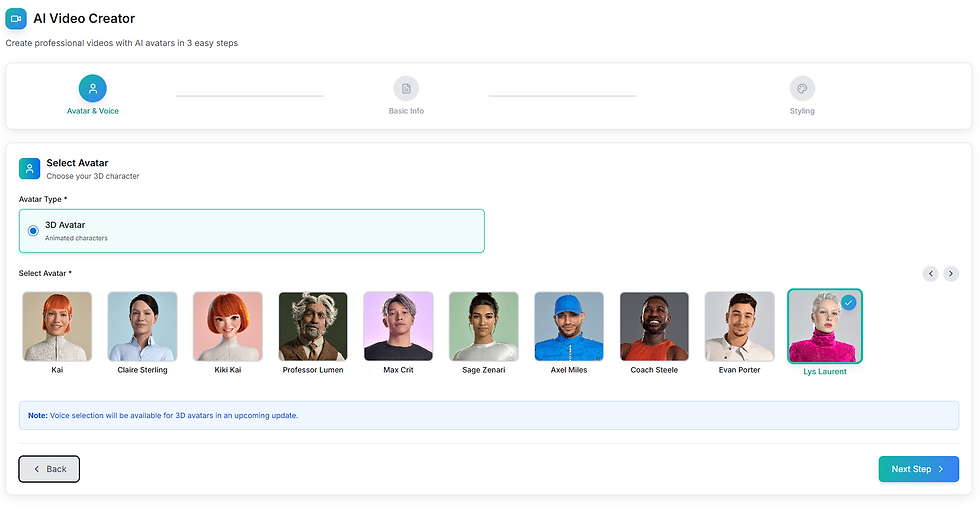
Step 1: Basic Information
Choose avatar type: Begin by selecting the type of avatar you want to use for your video. Select the 3D Avatar option to work with Mimic Studio’s realistic, high-fidelity digital humans.This enables advanced facial animation, high-quality rendering, and a more lifelike on-screen presence for your content.
Select Your Avatar: Under Select Avatar, browse through the available characters from the Mimic Studio library. Each avatar has been designed with unique personalities, looks, and movement styles to match different content needs. Click on the avatar card to select your character.
Note: Voice selection for 3D avatars will be available in an upcoming update. For now, voices are available only for 2D avatars.
After selecting your avatar, press Next Step to move on to setting up your script and styling.
Step 2: Video Title & Script / Text
Enter a video title: Provide a clear, descriptive title. This helps you identify the video later in your dashboard.
Write your script: Type or paste your dialogue into the Script / Text field. Scripts can range from a short sentence to several paragraphs (up to 5,000 characters).
Proceed: Once all fields are complete, click Next Step to continue.

Step 3: Styling & Generation
Dimension: Use the Dimension dropdown to pick the output size (resolution + orientation), e.g., 1280×720 (Landscape).
Background (optional):
Default — uses the standard background.
Color — choose a solid color background.
Generate: Click Generate Video to render your clip.
Preview & download: When rendering finishes, your video appears in the Video Creator list. Open it to preview, download, or manage it.

Tip: Use Previous to return to earlier steps if you need to change the avatar or script before generating.
Integrations & Deployment
Embeddable Widgets
The Widget Generator lets you embed your AI avatar on a website as a chat widget. To create a widget:
Go to Widget Generator: In the Integration menu, select Widget. Click Create to open the wizard.
Enter widget details: Provide a Widget Name and the Website URL where the widget will be embedded. These details help generate a unique script snippet.
Assign to a project: Choose which project the widget will belong to, ensuring the correct avatar and logic are used.
Review and generate code: In the final step you’ll receive a code snippet (JavaScript) to paste into your website. This script loads the interactive avatar chat on your site. A live demo preview on the right side shows how the widget will appear.

External Integrations (Alpha)
Mimic Studio provides integrations with third‑party platforms to extend functionality. The Integrations page lists available integrations and currently includes Zapier, which connects to over 5,000 apps via automation workflows. Users can click Connect to link their Mimic account with Zapier and use webhooks or prebuilt automations to trigger avatar actions or pass conversation data to other tools.

Analytics and Insights
The Analytics section provides aggregated metrics on platform usage. Key dashboards include total users, active subscriptions, monthly revenue and total usage time. Administrators can filter results, export reports and view detailed subscription tables to monitor plan usage and user engagement. These insights help you optimize your avatars and plan allocation.

Administration
The Admin Panel offers controls for system administrators and enterprise accounts. Key sub‑sections include:
LLM Configs: Manage large‑language‑model configurations. Each entry lists the model (e.g., GPT‑4, Gemini Pro), temperature and token limits. You can toggle models on/off, edit settings or remove them.
Avatars: View all avatars available in the workspace. Toggle visibility, edit details or delete avatars. An Add Avatar button allows you to import new avatars for your team.
Notifications: Create and manage user notifications. You can mark notifications as seen or add new ones; this is useful for system updates or feature announcements.
Plans: Define subscription tiers. Each plan lists its monthly/annual price, minutes provided, status (active/inactive) and whether it’s the default plan. Administrators can add new plans or adjust existing ones.
Add‑Ons: Create optional add‑on packages such as extra minutes or premium character builder features.
Tips for Effective Use
Write clear scripts: The quality of your AI video heavily depends on the script. Use natural language and break long sentences into shorter phrases for better lip‑sync and pacing.
Match avatar: Choose avatars that fit your brand persona. For formal training, a professional avatar and neutral voice work well; for casual marketing, select an energetic character and expressive voice.
Leverage analytics: Regularly review usage metrics to understand which videos or avatars resonate with your audience. Adjust scripts, styles based on engagement data.
Plan minutes wisely: Paid plans include a set number of minutes; monitor your usage to avoid unexpected limits. Consider add‑ons if you need extra minutes for large projects.
Keep avatars on brand: Use the character builder (when available) to align avatars with your company’s look and feel. Consistency builds trust and recognition.
Conclusion
Mimic Studio offers a robust toolset for creating and deploying AI‑powered avatars across websites, campaigns and customer experiences. The platform’s modular workflow-selecting avatars, crafting scripts, choosing voices and styling videos-makes it approachable for both beginners and advanced users. Its integration capabilities, analytics dashboard and administrative controls provide the scalability needed for enterprise deployments. By following the steps in this guide, you’ll be equipped to design engaging AI avatars, produce compelling videos and embed them seamlessly into your digital ecosystem.


Comments